Saturday, February 22, 2020

Full Stack Asp.Net Core App (Bootcamp Project) - Part 1 - Introduction

In the last weeks I decided to review my Javascript front-end lessons from last year's bootcamp. It was a locally organized intensive course, with the aim of hiring those who finish it.
I worked hard to learn javascript and node.js on that course, graduated the bootcamp, but finally remained with my .net projects for my former employer instead of being hired by the organizer of the bootcamp.

For your info, I described the bootcamp in more detail in this post.

Just to review Vanilla JS once again, I decided to re-do the project, this time with Asp.Net Core Backend instead of Node.JS, just to practice my API skills in Asp.Net Also.

The aim of the project is, to do things manually, without the use of any front-end frameworks:
  • writing the pages in plain html, and all styling in css without bootstrap or other systems
  • all interactions with user will be via plain Javascript
  • the back-end Api-s are Asp.Net Core Web API
  • the pages are served via Asp.Net Core Razor Pages
  • database for back-end MS SQL with EF Core (database-first)
Prerequisites for the application and sources for preparation:
App is live under: https://notes.zoltanhalasz.net/

Full code of the app can be found: https://github.com/zoltanhalasz/SmartNotes.git

The SQL to create the database is: under the Github folder above, file: script.sql

I won't promise that I will lead you through the application step by step, because of its complexity and also it's a study project, nothing perfect in it, but can be a great learning tool for you. :)

What the application does not include:
- no special user management, identity, authorizations, no password hashing, only basic cookie-based user login/authentication
- no special protection for the Web APIs
- no Jquery or JS Framework on the frontend, only basic Vanilla JS, with  Fetch for AJAX
- no dashboard or advanced features, statistics
- it is not a perfect application, from the formatting or design/engineering point of view. It is a sample to learn the above mentioned features.


Description of the project
- Manage notes/(small blog posts) of users - add notes: title, content, add color, add images;
Navigate between notes and images, edit existing notes, search and sort notes.
- Signup of Users - collect email, password and name from user
- Login Users - based on name and password

The application has just a couple of pages, in the following logical order:

Index/Home Page
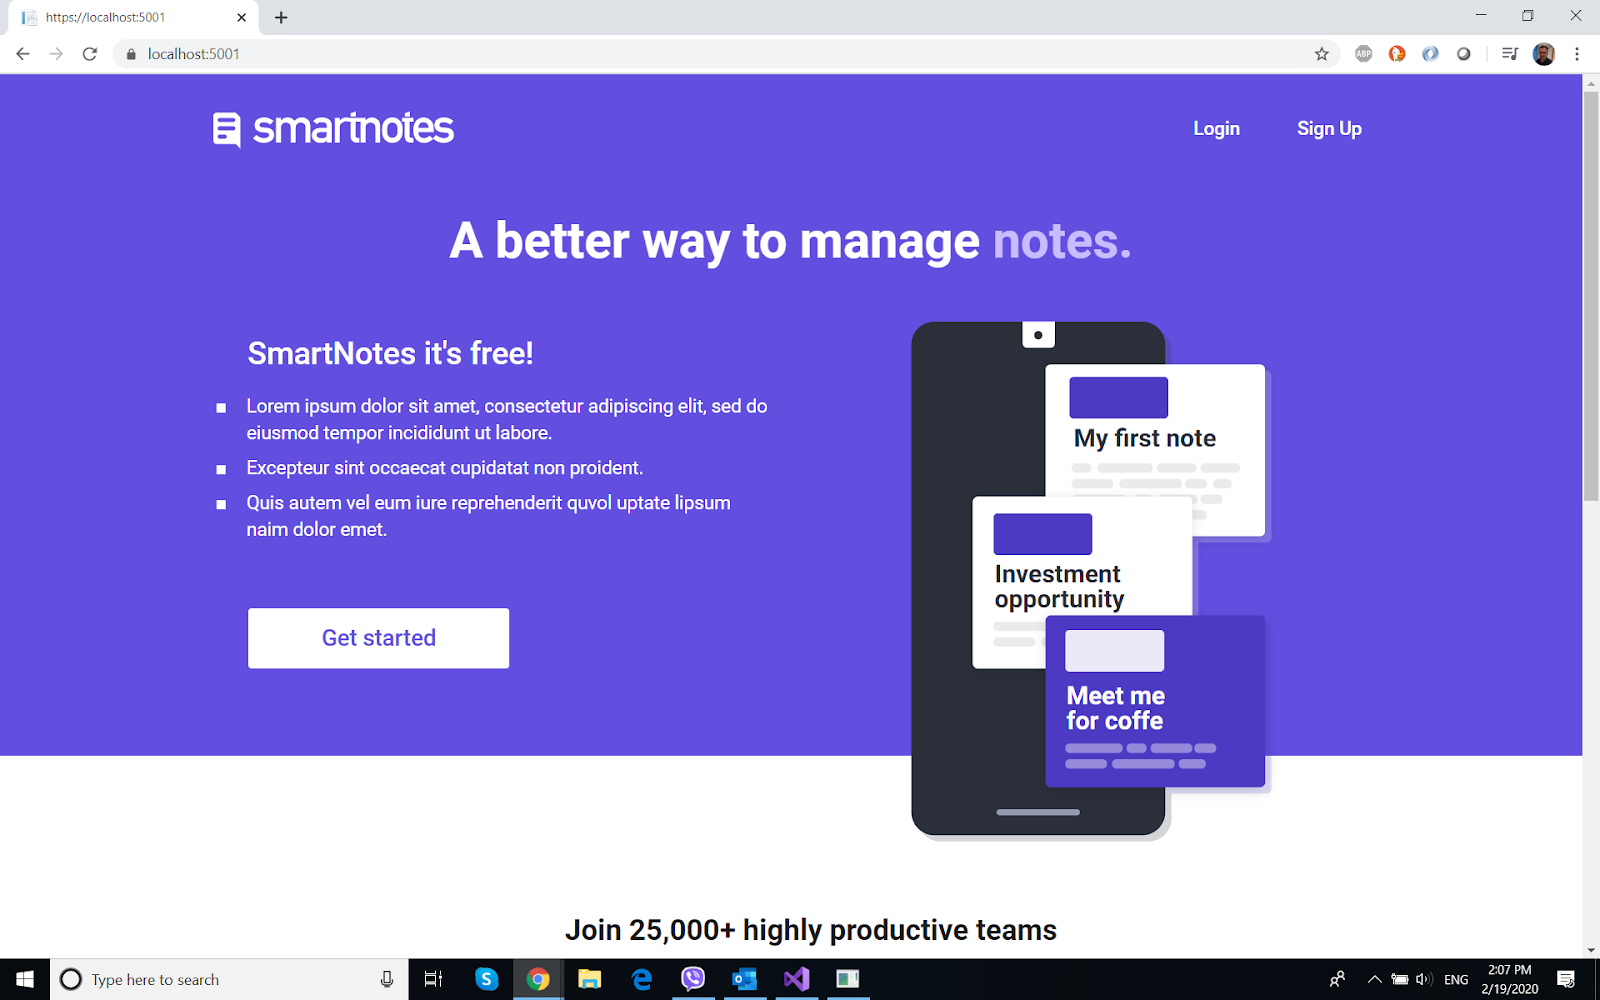
This is the landing page for the application. It's plain html with css written manually, integrated into Razor Pages Index.CsHtml
From this page, users can signup or login.


Signup Page


The design here is also manual, integrated into Razor Pages (no layout). The user can register by filling in basic info.
Login Page


In order to write notes, users must log in, using this page. Very basic design, manually written.
Notes Page


This is the main page of the app, users who are logged in, can create and manage notes. Color can be changed, images can be added and the title/content can be edited for each note. Additionally, searching and ordering the notes is possible.
Error Page


Tuesday, February 18, 2020

Full Stack Mini ToDo-App With Javascript, Ajax, API Controller and In-Memory Database (Asp.Net Core Razor Pages)


During the last couple of days, I decided to revisit my basic DOM Javascript skills, and among other things, decided to write some mini-projects to exercise.

The topics touched in this tutorial are:
1. Front-end Javascript for DOM manipulation
2. Fetch API
3. Web Api controller in Asp.Net Core
4. In-Memory database for EF Core
5. Razor pages project

Materials to follow:
1. Main inspiration of the tutorial was Ajax tutorials from Dennis Ivy (front-end is 90% from him) https://www.youtube.com/watch?v=hISSGMafzvU&t=1157s
2. Repo for the app is:  https://github.com/zoltanhalasz/TodoApp
3. In-Memory database used here (check my materials with Razor pages or https://exceptionnotfound.net/ef-core-inmemory-asp-net-core-store-database/)
4. Web Api - generated from EF Core CRUD automatically in Visual Studio, from the model
5. Application is live under: https://todolist.zoltanhalasz.net/

Main steps of the app:
1. Create Razor Pages App, without authentication

2. Create Class for ToDO
    public class ToDoModel
    {
        public int id { get; set; }
        public string title { get; set; }
        public bool completed { get; set; }
    }
3. Based on the class, the context is created with a table and included in startup.cs. EntityFrameworkCore has to be installed as nuget package.

    public class ToDoContext : DbContext
    {
        public ToDoContext(DbContextOptions<ToDoContext> options)
            : base(options)
        {
        }

        public DbSet<ToDoModel> ToDoTable { get; set; }
    }

and in the ConfigureServices method/startup.cs

 services.AddDbContext<ToDoContext>(options => options.UseInMemoryDatabase(databaseName: "ToDoDB"));
         
4. Add a Controller folder, then scaffold Web-api (CRUD with EF Core), can be done based on above class and Context.


5. Front-End, content of index.cshtml file:


Tuesday, February 11, 2020

AG-Grid Tutorial With Asp.Net Core Razor Pages - Part 3


Prerequisites:
1. Check previous tutorial, part 2
2. Check documentation for Ag-Grid, I will link it under the right point
3. App is online: https://ag-grid3.zoltanhalasz.net/
4. Repository for this tutorial: https://drive.google.com/open?id=1WAbKlYsg3lpbfwE-NfYOmHFFtYPOck_f
5. Intermediate Javascript and Asp.Net Core Razor Pages

As a continuation of my study for this grid system, I checked the following options:

1. Row selection, and removal of rows using Ajax
https://www.ag-grid.com/javascript-grid-selection/

The goal here is to select the rows and remove them from the list and the database table.
The selection is described in above link and implemented in the javascript part of the index page.

    function deleteSelectedRows() {
        var selectedNodes = gridOptions.api.getSelectedNodes()
        var selectedData = selectedNodes.map(function (node) { return node.data })
     
        if (selectedData) {
        postData('./api/InvoiceModels', selectedData)
            .then((data) => {
                console.log("response", data); // JSON data parsed by `response.json()` call
            });
        }


In order to do this, I created an api controller, for the InvoiceModel class and placed it in the Controllers Folder. Then rewrote the post routing, which takes a list of invoicemodel as an input, and then deletes them from the table:

        // POST: api/InvoiceModels
        [HttpPost]
        public async Task<ActionResult<List<InvoiceModel>>> PostInvoiceModel(List<InvoiceModel> invoiceModels)
        {
            if (invoiceModels==null) return NoContent();
            foreach (var model in invoiceModels)
            {
                var myinvoiceModel = await _context.InvoiceTable.FindAsync(model.ID);
                if (myinvoiceModel != null)
                {
                    _context.InvoiceTable.Remove(myinvoiceModel);
                }
           
            }

            await _context.SaveChangesAsync();

            return await _context.InvoiceTable.ToListAsync();
        }

There is a Fetch Command  in the index page which communicates with this Api route :
 async function postData(url = '', data = {}) {
        console.log(JSON.stringify(data), url); 

        await fetch(url, {
            method: 'POST', // *GET, POST, PUT, DELETE, etc.
            headers: {   
                'Content-Type': 'application/json',       
            },           
            body: JSON.stringify(data) // body data type must match "Content-Type" header
        }).then(function (response) {
            console.log(response.json());       
        }).then(function (response) {
            agGrid.simpleHttpRequest({ url: './Index?handler=ArrayData' }).then(function (data) {
                gridOptions.api.setRowData(data);
            });
        }).catch(() => console.log("err"));
    }

2. Filtering Options
please study: https://www.ag-grid.com/javascript-grid-filter-provided-simple/
a. with filter set to false the filter is invisible for that column
b. for numeric filters, we can use the below (actually this will be with a range)
        {
            headerName: "Amount", field: "Amount",
            filter: 'agNumberColumnFilter', filterParams: {
                filterOptions: ['inRange']
            }

        },
c. for the category, a text filter will be used:
        {
            headerName: "CostCategory", field: "CostCategory", checkboxSelection: true,
                filter: 'agTextColumnFilter', filterParams: {
                        defaultOption: 'startsWith',
                        resetButton: true,
                        applyButton: true,
                        debounceMs: 200
                }

        },

3. Data import
a. I saved the import.xlsx file under wwwroot/uploads, having the following structure
(below data is tab delimited)
ID InvoiceNumber Amount CostCategory Period
1 1 500.00 Utilities 2019_11
2 2 121.69 Telephone 2019_12
3 3 342.61 Services 2019_11
4 4 733.21 Consultancy 2019_11
5 5 107.79 Raw materials 2019_10
6 6 161.44 Raw materials 2019_11
7 7 334.48 Raw materials 2019_11
8 8 504.63 Services 2019_11
9 8 869.44 Services 2019_11
10 9 401.57 Services 2019_11

b. I checked the upload documentation and took their example https://www.ag-grid.com/example-excel-import/

c. please see the implementation of point b, it is almost copy-paste, just adding my columns instead:

After pushing the import button, the grid is filled in with the values from import.xlsx placed in wwwroot/uploads.

result will be:


The contents of the import page:

@page
@model DataTables.ImportModel
@{
    ViewData["Title"] = "Import";
    Layout = "~/Pages/Shared/_Layout.cshtml";
}

<h1>Import from pre-uploaded excel file (import.xlsx)</h1>

<script src="https://unpkg.com/xlsx-style@0.8.13/dist/xlsx.full.min.js"></script>
<script src="~/js/ag-grid-community.min.js"></script>
<div class="container">
    <div class="row">
        <button onclick="importExcel()" class="btn-outline-info">Import Excel</button>
    </div>
    <div class="row">
        <div id="myGrid" style="height: 500px;width:650px;" class="ag-theme-balham-dark"></div>
    </div> 
</div>
    <script>
        // XMLHttpRequest in promise format
        function makeRequest(method, url, success, error) {
            var httpRequest = new XMLHttpRequest();

            httpRequest.open("GET", url, true);
            httpRequest.responseType = "arraybuffer";

            httpRequest.open(method, url);
            httpRequest.onload = function () {
                success(httpRequest.response);
            };
            httpRequest.onerror = function () {
                error(httpRequest.response);
            };
            httpRequest.send();
        }

        // read the raw data and convert it to a XLSX workbook
        function convertDataToWorkbook(data) {
            /* convert data to binary string */
            console.log(data);
            var data = new Uint8Array(data);
            var arr = new Array();

            for (var i = 0; i !== data.length; ++i) {
                arr[i] = String.fromCharCode(data[i]);
            }

            var bstr = arr.join("");

            return XLSX.read(bstr, { type: "binary" });
        }

        // pull out the values we're after, converting it into an array of rowData

        function populateGrid(workbook) {
            // our data is in the first sheet
            //console.log(workbook);
            var firstSheetName = workbook.SheetNames[0];
            var worksheet = workbook.Sheets[firstSheetName];

            // we expect the following columns to be present
            var columns = {
                'A': 'ID',
                'B': 'InvoiceNumber',
                'C': 'Amount',
                'D': 'CostCategory',
                'E': 'Period'
            };

            var rowData = [];

            // start at the 2nd row - the first row are the headers
            var rowIndex = 2;

            // iterate over the worksheet pulling out the columns we're expecting
            while (worksheet['A' + rowIndex]) {
                var row = {};
                Object.keys(columns).forEach(function (column) {
                    row[columns[column]] = worksheet[column + rowIndex].w;
                });

                rowData.push(row);
                console.log(row);
                rowIndex++;
            }

            // finally, set the imported rowData into the grid
            gridOptions.api.setRowData(rowData);
        }

        function importExcel() {
            makeRequest('GET',
                '/uploads/import.xlsx',
                // success
                function (data) {
                    var workbook = convertDataToWorkbook(data);
                    populateGrid(workbook);
                },
                // error
                function (error) {
                    throw error;
                }
            );
        }

        // specify the columns
        var columnDefs = [
            { headerName: "ID", field: "ID", width: 50 },
            { headerName: "InvoiceNumber", field: "InvoiceNumber", width: 80 },
            { headerName: "Amount", field: "Amount", width: 100 },
            { headerName: "CostCategory", field: "CostCategory" },
            { headerName: "Period", field: "Period" },
        ];

        // no row data to begin with
        var rowData = [];

        // let the grid know which columns and what data to use
        var gridOptions = {
            columnDefs: columnDefs,
            rowData: rowData,
            onGridReady: function () {
                gridOptions.api.sizeColumnsToFit();
            }
        };

        // wait for the document to be loaded, otherwise
        // ag-Grid will not find the div in the document.
        document.addEventListener("DOMContentLoaded", function () {
            console.log('before create grid');
            // lookup the container we want the Grid to use
            var eGridDiv = document.querySelector('#myGrid');
            console.log(eGridDiv);
            // create the grid passing in the div to use together with the columns & data we want to use
            new agGrid.Grid(eGridDiv, gridOptions);
        });

    </script>


Monday, February 10, 2020

Some Other Great Asp.Net Core Tutorials in 2020

In the last weeks, I have been looking to further materials and information related to my main subject of study, Asp.Net Core. Even if my main projects are in .Net WPF, I really like the Asp.Net web world, and that's where I am deepening my knowledge.

Before going through the latest tutorials, the material I purchased from the code-maze guys has to be mentioned Asp.Net Core Web API course. This is the most serious course material I probably purchased, but easy to follow, with full support and explanations. I really prefer this approach vs Udemy or Youtube. I like to have a pdf file with explanations, code snippets and code repo, versus the lengthy youtube videos from any trainer, even if they are free.


In addition to the above, lets's see what I have found and studied (all of them, but not very deeply) in the last couple of weeks:

1. The blog of Saineshwar Bager, tutexchange.com

a)
https://tutexchange.com/creating-grid-view-in-asp-net-core-with-custom-searching/

This one contains a tutorial, how to present tabular data with paging, search and sorting data with asp.net core mvc. Really nice and useful one. Medium difficulty.

b)
https://tutexchange.com/how-to-upload-files-and-save-in-database-in-asp-net-core-mvc/


How to upload file content to a MS SQL database, some new idea, maybe I will further this idea on a later project. Really good quality one, as a), so I can only recommend his blog, which is a true delight for Asp.Net Core learners.

2. Another great tutorial source https://dotnetthoughts.net

c) Even if I prepared a Chart.JS tutorial in Dec 2019, this is a great one too, with Google Charts, see
https://dotnetthoughts.net/integrating-google-charts-in-aspnet-core/

d) From the same source, how to deploy an asp.net core app on Heroku:
https://dotnetthoughts.net/hosting-aspnet-core-on-heroku/

Until now I published my small works on Interserver.net, but this time I published my c) and d) learning directly on heroku! :)
https://dotnet-core-chart.herokuapp.com/


3. I always wanted to check the Angular client generation with NSWAG, so I tested this one out:
e) https://elanderson.net/2019/12/using-nswag-to-generate-angular-client-for-an-asp-net-core-3-api/

I wish the explanations were clearer on this site!

4. Also tried this one, Angular Chat app with SignalR

f) https://morioh.com/p/70381fe201a4?f=5c21f93bc16e2556b555ab2f&fbclid=IwAR0i4C9Mw9tfYJKWjTjoEuV8ngIN_lV3oxUevCFlyYXh3IT36NYQzXTjy1I
The idea is great, but the tutorial explanations are a bit superficial.

What would be your additions to the asp.net core tutorial world?

Monday, February 3, 2020

AG-Grid Tutorial With Asp.Net Core Razor Pages - Part 2

Continuing the AG Grid series, I added some other features to my previous post. I cleared the repo a little bit, removing some unnecessary files and dependencies, and also adding the ag-grid specific js and css files to the local folder, instead of accessing them from the internet. So, I apologize because of the quality of the previous code.

My observation until now is that DataTables.js as a free JavaScript grid is an easier solution versus Ag-Grid. Later on I will try some enterprise features of Ag-Grid, maybe this will compensate for that.

Preliminary steps:
1. check the previous tutorial: https://mydev-journey.blogspot.com/2020/01/ag-grid-tutorial-with-aspnet-core-razor.html
1. application is live under: https://ag-grid2.zoltanhalasz.net/
2. zipped(cleaned) repo of the application: https://drive.google.com/open?id=10A0as_DTC94ve_oVtDF2uFW1cX19k4J7


How the app will look like:


The steps of the tutorial are:

1. please remove the unnecessary files from the wwwroot (if you are using the part 1 repo).

2. check their official community resource from github, cloning their repo https://github.com/ag-grid/ag-grid/tree/master/community-modules/all-modules/dist

a. take the file ag-grid-community.min.js and copy it under wwwroot/js folder
(or ag-grid-community.noStyle.js)

b. the same, for the CSS files, taken from the Styles folder in the repo above
copy the them in the Css folder, and then reference them from the Layout file:
    <link rel="stylesheet" href="~/css/ag-grid.css">
    <link rel="stylesheet" href="~/css/ag-theme-balham.css">

3. the whole source of the index page will be:

<script src="~/js/ag-grid-community.min.js"></script>
<h1>Hello from ag-grid - Part 2</h1>

<div>
    <div id="mybutton">
        <button onclick="onExportCsv()" class="btn-info">Export Csv</button>
    </div>
    <div id="myGrid" style="height: 450px;width:900px;" class="ag-theme-balham"></div>
</div>


<script type="text/javascript" charset="utf-8">

    var deleteRenderer = function(params) {
        var eDiv = document.createElement('div');
        eDiv.innerHTML = '<span class="my-css-class"><button class="btn-del btn-danger btn-xs">Delete</button></span>';
        var eButton = eDiv.querySelectorAll('.btn-del')[0];

        eButton.addEventListener('click', function() {         
            console.log('will be deleted, invoice no:', params.data.ID);
            window.location.href = './Delete?id='+params.data.ID;
        });

        return eDiv;
    }
    var editRenderer = function (params) {
        var eDiv = document.createElement('div');
        eDiv.innerHTML = '<span class="my-css-class"><button class="btn-edit btn-warning btn-xs">Edit</button></span>';
        var eButton = eDiv.querySelectorAll('.btn-edit')[0];

        eButton.addEventListener('click', function() {         
            console.log('will be edited, invoice no:', params.data.ID);
            window.location.href = './Edit?id='+params.data.ID;
        });

        return eDiv;
    }

    var detailsRenderer = function (params) {
        var eDiv = document.createElement('div');
        eDiv.innerHTML = '<span class="my-css-class"><button class="btn-details btn-info btn-xs">Details</button></span>';
        var eButton = eDiv.querySelectorAll('.btn-details')[0];

        eButton.addEventListener('click', function() {         
            console.log('will be info, invoice no:', params.data.ID);
                  window.location.href = './Detail?id='+params.data.ID;
        });

        return eDiv;
    }
    // specify the columns
    var columnDefs = [
        { headerName: "InvoiceNumber", field: "InvoiceNumber" },
        { headerName: "Amount", field: "Amount" },
        { headerName: "CostCategory", field: "CostCategory" },
        { headerName: "Period", field: "Period" },
        { headerName: "Delete", field: null, cellRenderer: deleteRenderer },
        { headerName: "Edit", field: null, cellRenderer: editRenderer },
        { headerName: "Details", field: null, cellRenderer: detailsRenderer },
    ];

    // let the grid know which columns to use
    var gridOptions = {
        columnDefs: columnDefs,
        defaultColDef: {
            sortable: true,
            filter: true,
            width: 120,

        },
        rowHeight : 35,
        pagination: true,
        paginationPageSize: 10,     
    };

    // lookup the container we want the Grid to use
    var eGridDiv = document.querySelector('#myGrid');


    function getParams() {
        return {
            suppressQuotes: null,
            columnSeparator: null,
            customHeader: null,
            customFooter: null
        };
    }

    function onExportCsv() {
        var params = getParams();
         gridOptions.api.exportDataAsCsv(params);
    }
 
    // create the grid passing in the div to use together with the columns & data we want to use
    new agGrid.Grid(eGridDiv, gridOptions);

    agGrid.simpleHttpRequest({ url: './Index?handler=ArrayData' }).then(function (data) {
        gridOptions.api.setRowData(data);
    });

</script>

5. pagination
- this is solved using the gridOptions object, setting the properties:
        pagination: true,
        paginationPageSize: 10,   

6. Csv export (basic)
- this is managed using the button with id = "mybutton", and writing its onclick event function:
    function onExportCsv() {
        var params = getParams();
         gridOptions.api.exportDataAsCsv(params);
    }

for the params object, I returned the basic features for a csv export using getParams function.

See more detailed explanation about csv export on their page: https://www.ag-grid.com/javascript-grid-csv/

7. height and width on the rows/columns
     width: 120, // in defaultColDef properties
     rowHeight: 35, // in gridOptions properties

8. cell rendering (basic)
for example, in the columnDef for Delete
      { headerName: "Delete", field: null, cellRenderer: deleteRenderer },
deleteRenderer will be a function generating html for the delete button


    var deleteRenderer = function(params) {
        var eDiv = document.createElement('div');
        eDiv.innerHTML = '<span class="my-css-class"><button class="btn-del btn-danger btn-xs">Delete</button></span>';
        var eButton = eDiv.querySelectorAll('.btn-del')[0];

        eButton.addEventListener('click', function() {         
            console.log('will be deleted, invoice no:', params.data.ID);
            window.location.href = './Delete?id='+params.data.ID;
        });

        return eDiv;
    }

9. Detail, Edit, Delete Razor pages added for complete CRUD, as per cell rendering links suggest.
This is achieved using Entity Framework applied on the In-Memory database.